This display of values allows the user to see and analyze the numeric results of the measurement.
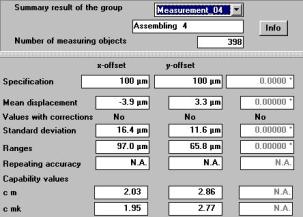 Fig. 17: Numerical results for Chips shooters(click for larger version)
Figure 17 shows the type of numerical data displayed after each measurement. This table shows the mean values and the standard deviation of the measurement. It must be interpreted with the specifications defined by the manufacturer and the target for Cp and Cpk.
This machine has no problem with placement; mean values are close to the nominal (nearly zero), standard deviations are low with Cp and Cpk greater than 1.33.
3. Graphical Representation:
The graphical evaluation program offers a variety of pictorial analysis tools, including single value diagrams, scatters plots, probability plotting, and histograms. These tools are most powerful for identifying the root causes of machine drifts. The common charts are as follows:
- X-Y Scatter plot provides a snapshot of centering and spread of the placement.
- Frequency Plot and Probability Plot are used to control the normality of the placement.
- Sequence of placement can be used to detect abnormal behavior of axis or heads.
- Relation between X-coordinates, Y-coordinates, heads and rotations can be easily established.
Figure 18 shows different graphical representations after a machine capability measurement. This is an X-Y scatter plot for a machine with 2 placement heads. The measuring plan also includes 4 rotations for each head. There is an "angle effect" for head 1 (centering problem for each rotation) and a systematical y-deviation for head 2 (centering problem).
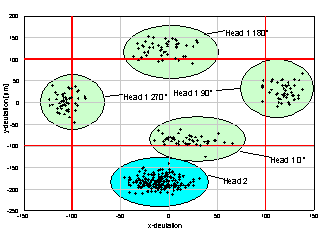 Fig. 18: X-Y scatter plot before offsets
In this case, different actions are possible:
When a problem results from a systematical deviation, data from the Cm System must be used to calibrate the machine. Mean values associated with nozzles or spindles, angles of rotation and/or placement heads can be changed as "offset adjustments". Some equipment includes its own auto-calibration system.
If offset adjustments and auto-calibration tools are not sufficient to correct the machine, a high standard deviation must be reduced after mechanical adjustments or replacement of wearing parts such as shafts or holders. Work involving the correction of offset adjustments is generally very time consuming and expensive.
Typically, when offsets have been implemented to a machine, the mean value of placement is close to the nominal. Machine capability closely matches that specified by the manufacturer, as shown in Figure 19.
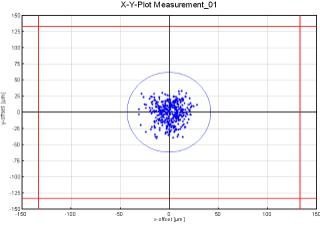 Fig. 19: X-Y scatter plot after offsets(click for larger image)
The next example shows a diagram for a sequence of measurements on a pick and place machine with 4 spindles. There is a systematical deviation of 2 spindles and also a general offset on the head. This machine needs to be calibrated using offsets defined by the Cm System on each spindle.
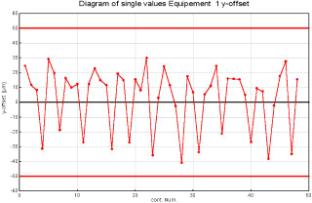 Fig. 20: Relation between sequence of placement and Y-offset BEFORE applying offsets(click for larger image)
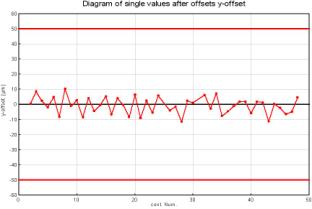 Fig. 21: Relation between sequence of placement and Y-offset AFTER applying offsets(click for larger image)
After applying offsets, systematical deviation on Y-direction disappears. The placement window is between ��� 10 ���m, indicating that the machine is now performing accurately and is capable.
These results demonstrated that machine capability determination and thorough graphical and numerical analysis must be performed together to obtain valuable information on equipment.