|
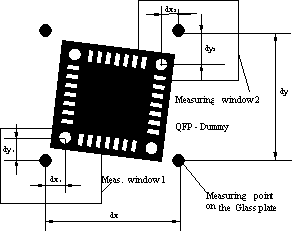
Thirdly, the actual measurement of component placement starts. During QFP analysis, for example, the rotational accuracy can be measured, making it necessary to measure at least two opposing corner images when evaluating placement accuracy. Due to their symmetrical design, QFPs can be measured at all four corners, allowing for even greater accuracy. The figure below presents the principle of the optical measurement for a glass QFP.
 Fig. 12: Glass QFP measurement principle Fig. 12: Glass QFP measurement principleThe Cm System is able to automatically eliminate discrepancies caused by vision error during the measurement of the glass QFP fiducials (also for chip components and deposit shapes). Common errors are
- Errors in the defined values.
- Errors in the measuring plan.
- Dirty or unrecognizable fiducials.
- Inappropriate contrast.
- Accuracy of the deposits (solder paste or glue), etc.
Moreover, measurement accuracy is ensured by the following factors:
- Structural accuracy of the glass plate and the dummy components.
- Automatic evaluation of images using stable sub-pixel algorithms.
- Use of an exact camera calibration technique.
- Exact camera placement system which orients the camera relative to the global fiducials.
Optimal image contrast is also necessary to achieve maximum accuracy of the measurement. The desired level of repeatability and stability of the image analysis can be reached only by using homogenous transmitted-light.
 Fig. 13: Transmitted light principle Fig. 13: Transmitted light principleEven though it is theoretically possible to use incident light in special cases, we need to recognize that it may reduce the reliability of the recognition system and the accuracy of the measurement due to poor contrast.
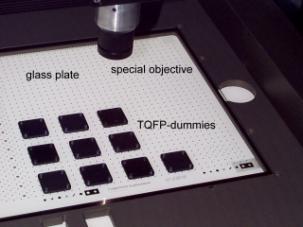
Figure 14 shows the inside of the Cm System during a measurement process on glass QFPs.
 Fig. 14: Cm System measurement Fig. 14: Cm System measurementThe Cm System then calculates the placement offsets (deviation of average value from nominal value) along the X, Y and q axes. For chip components, only X and Y offsets are estimated; the q offset is not examined. The evaluation of placement accuracy includes the following points:
- Calculation of the mean values, standard deviations and ranges for all measurements.
- Calculation of offset adjustment values.
- In-depth-evaluation to determine if machine is out of specification. Hidden machine failures like bent nozzles or damaged heads are usually uncovered at this stage.
Three tools are available to analyze the measurement results:
1. Contour Map:
Contour map provides an overview of how the machine functioned at various locations on the glass plate by plotting the measurement results as colors.
The measured deviation from the specified location is used as base points. A net is then drawn over the base points with the mean values interpolated. The colors indicate the amount of discrepancy; red colors are positive deviance and blue colors are negative deviance. The green colors indicate that the measured values were within tolerance. The scale and the value set of a color can be edited. This is the initial view of the results which are very helpful for first diagnostic interpretation of problems on a machine.
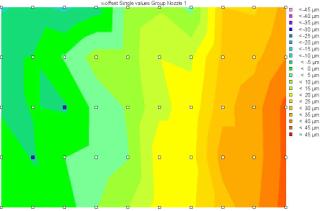
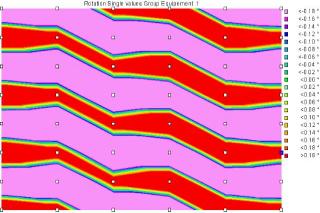
Figures 15 and 16 show different outputs from the Cm System software after different machine evaluations.
 Fig. 15: Contour Map for QFP/X-offset/Nozzle1(click for larger version) Fig. 15: Contour Map for QFP/X-offset/Nozzle1(click for larger version)This contour map represents the X-offset for 50 QFPs (white squares) using a cartography representation. In this example, there is a drift along the X-offset of the placement head. The origin of this problem is an angle of rotation related issue with the head along the X-axis.
The following contour map shows 48 measured QFPs and represents a head related q-offset issue.
 Fig. 16: Contour Map for QFP/q-Offset/Head(click for larger version) Fig. 16: Contour Map for QFP/q-Offset/Head(click for larger version)On this 4 nozzle placement head, we have found a problem with the Theta encoder. Nozzle 1 and 2 always place components with a positive rotation greater than 0.18��� and nozzles 3 and 4 behave in just the opposite manner.
<< Back to Page 3 Page 5 >>

POST A TALKBACK TO THIS ARTICLE!
The SMT Express is brought to you by SMTnet.
|